Threat Models are a hugely valuable resource for modern tech businesses. They provide a framework for reducing risk and shifting security left, and that’s why they are used across the leading tech firms right up to the major cloud providers.
But how do you make a meaningful start to threat modelling?
The process of threat modelling is collaborative, involving a team of people. Here are 6 simple steps to get started.
1. Define the scopeAt the start of the process, it’s essential to decide exactly what is being threat modelled. In collaboration with the development and security teams, the system or set of software processes that will make up the threat model should be clearly defined.
2. Gather the teamAim for at least 3 people from the engineering team of the system in scope, a threat modeller or security expert who has previous experience of threat modelling, and a business stakeholder for the system at hand who can give insight into risks from the perspective of the business. Ideally, you shouldn’t have more than 6-10 people in the room, if it’s more than that it might be an indicator that the system you’re trying to threat-model is too big.
3. OrientationIn a session led by the threat modeller, orientation provides an introduction to threat modelling, including approach, session objectives and outputs.
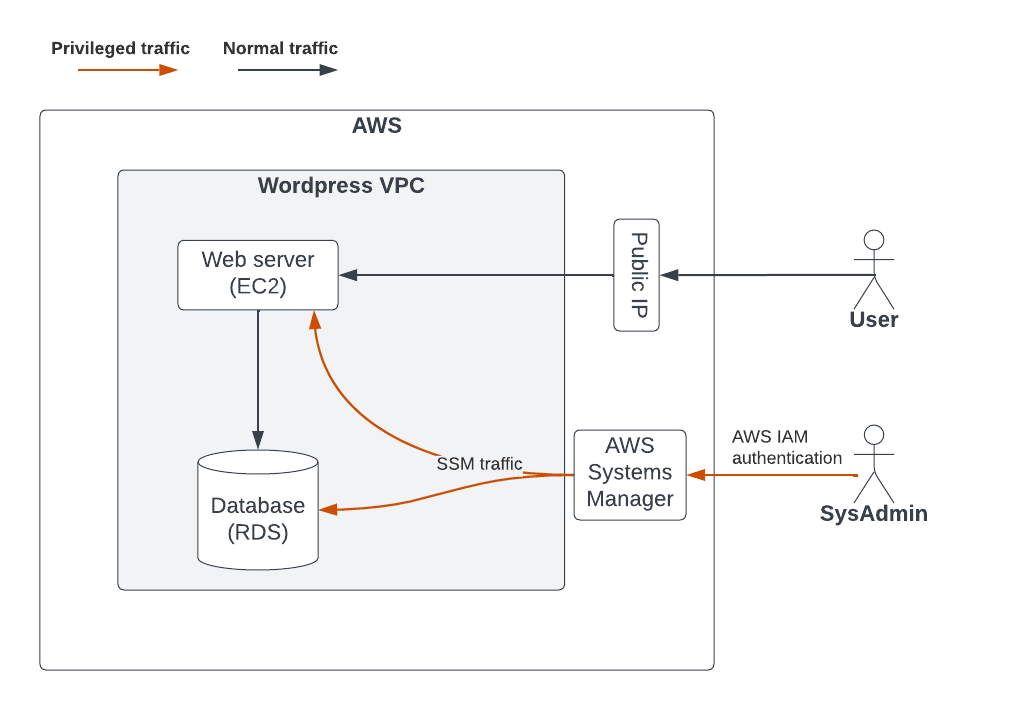
4. Data Flow Diagram (DFD)This diagram shows data flows within the system, highlighting flows between components and across trust boundaries. The DFD is a helpful visual tool in understanding the system and finding threats. At this stage, risks inherent in the system are also captured. It’s important not to get too hung up on the diagram. It’s not required to have the system fully designed, just the abstract which represents it.
5. Discover threats, identify impacts and risks
Using frameworks such as STRIDE, potential threats are discovered and captured. These threats are linked to a business risk with an associated risk level. Don’t try to start a conversation about solving or mitigating particular threats until you’ve got the whole picture in front of you.
6. Select controlsStarting with the most severe, the team examines each threat to explore possible controls to reduce the risk. Each threat typically has 3-6 possible controls after this step. This provides multiple options for reducing risk which can be chosen to fit other constraints (e.g. release cycles or engineering time). If you’re running short on time, you may opt to stop this step after you’ve covered your High-risk or Medium-risk threats.
Determining Security Risk is so important because ultimately it is how all businesses make decisions, not just in security. By understanding risk, you have a framework for prioritising and planning the steps to reduce it. By following this flow you’ll see a set of security risks to start with, and then start to see the level of risk coming down as you put controls in place. Your controls can now be added as stories to your engineering backlog. The risk level for the threat related to the stories determines the priority of the story. As these stories are finished, you should update the threat model to reflect this, and reduce the risk level accordingly.
Well done on making your first threat model! You’ll be able to use this document to reduce your security risk over time, show other teams the progress you’re making, and demonstrate the value of security work to senior colleagues.